Setup and Installation
Software Installation
Vitis & Vivado
You can find the Linux Self Extracting Web Installer AMD Unified Installer here. Vivado comes with Vitis by default so there is no need to download them seperately.
You will need root privileges to install the Vitis software.
In order to download the installer you must first sign in and fill out the Download Center info.
Navigate to where you downloaded the web installer and give it executable permissions chmod 777 Xilinx_Unified_2023.1_0507_1903_Lin64.bin
Run the installer.
Click Next and then select Vitis.
The Vitis suite can take up a lot of disk space. Luckily, for our purposes we only need a few of the options offered. Under Design Tools, all that is truly needed is Vitis, Vivado, and Vitis HLS. Under Devices the only one we need is Zynq UltraScale+ MPSoC in the SoCs section. After this agree to all.
You can keep the install location the same, although many tutorials have the install location as /opt/Xilinx instead of /tools/Xilinx.
Click Next and Install.
If the installer gets stuck on getting something yadayada you may need to install ncurses and restart installer.
Cable Drivers
This step shouldn’t be necessary as the cable drivers come with installation of Vitis. In the event that they did not, they can be downloaded here.
You should find the install_drivers script located here: <PathToXilinxRootFolder>/Vivado/2023.1/data/xicom/cable_drivers/lin64/install_script/install_drivers
Running the install_drivers script will set up permissions for both Xilinx FTDI and Digilent cable drivers. This action requires root privileges.
Rootless Docker
Create a folder, for example bin, in your home directory to house Rootless Docker.
cd into the folder and run the following command curl -fsSL https://get.docker.com/rootless | sh
Now add the current directory to your path with export PATH=$PATH:$(pwd).
Vitis-AI
First, clone the Vitis-AI repository using git clone https://github.com/Xilinx/Vitis-AI
Next, download the prebuilt cpu docker image with the command docker pull xilinx/vitis-ai-cpu:latest
cd to the directory where you cloned the Vitis AI repository
Next use any text editor to open the docker_run.sh file and remove the lines under the docker_run_params function:
-v /opt/xilinx/dsa:/opt/xilinx/dsa \
-v /opt/xilinx/overlaybins:/opt/xilinx/overlaybins \
-e USER=$user -e UID=$uid -e GID=$gid \
then save and close the file.
Then, you should be able to run the docker image:
./docker_run.sh xilinx/vitis-ai-cpu:latest
Finally activate the conda environment for pytorch
conda activate vitis-ai-pytorch # Board Setup
Petalinux SD Card
First, Download prebuilt image for the ZCU102 from Xilinx here and burn the image to the sd card Next, insert sd card into FPGA board and set to SD boot mode
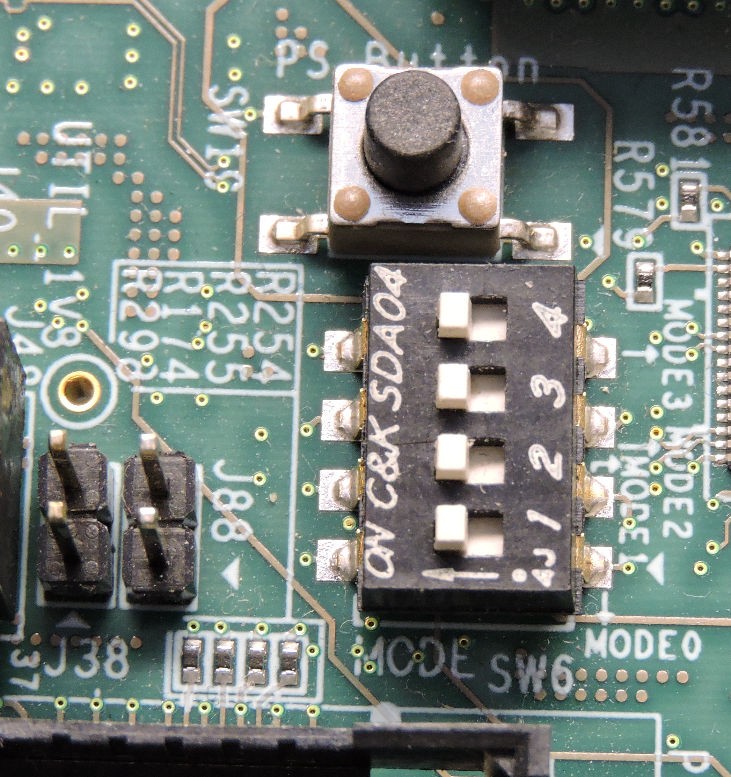
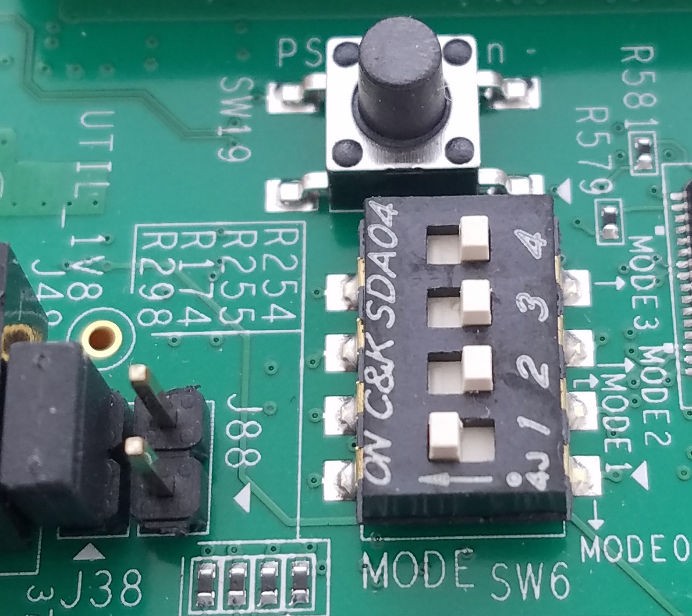
ZCU102 Boot Modes
JTAG is often used for programming and SD is for using Petalinux. Make sure the desired bootmode selected (SW6) before turning on the board.
Connecting to the Board
We can talk with the board in many ways, two of which are via serial and ethernet connections. Interacting with the Petalinux image aboard the ZCU102 can only be done when booted into SD mode.
Serial
Make sure the micro USB cable is plugged into the UART port (J83?) on the board and the host machine. Turn on the board.
The board should show up as ttyUSB0. You can check this by running cat /dev/ | grep ttyUSB. You should see ttyUSB0 listed.
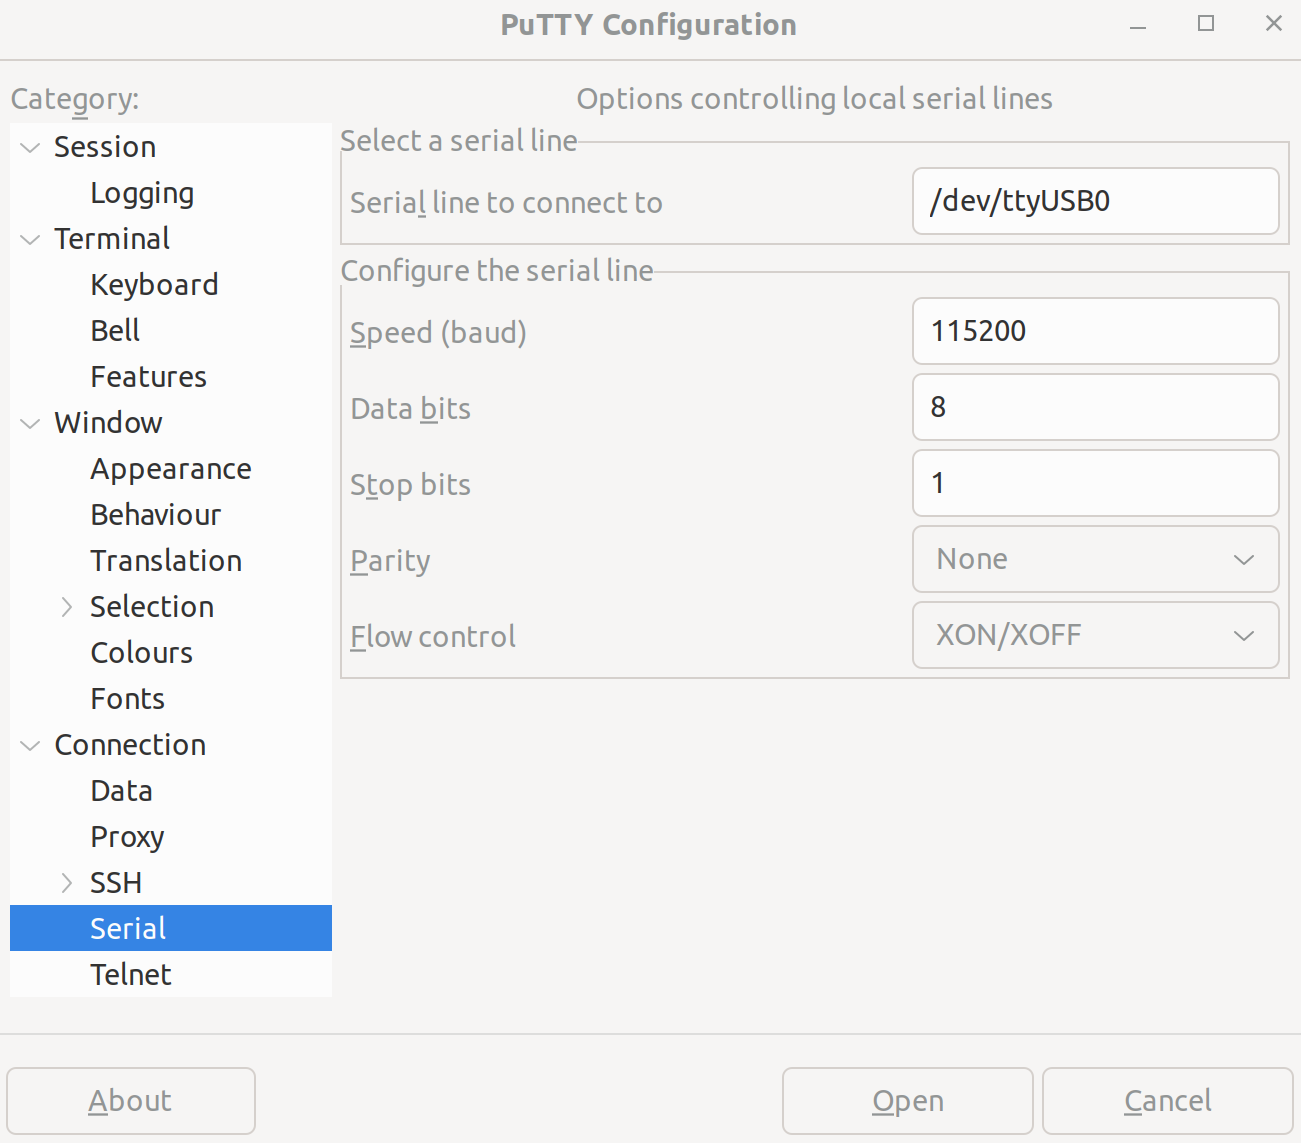
You should now be able to connect to the board using a serial communication program such as minicom or PuTTy. Use 8N1 (default parity settings) and a baudrate of 115200.
If you have issues, reseat the USB cable into the host machine and check the connection. If problems persist, check that the cable drivers are properly installed.
SSH
To use ssh the board must have an IP Address. It can get it one of two ways:
VCU SafeNet Wireless network will assign the board an IP address via DHCP. Just connect the board to an available network ethernet cable. This is the recommended method.
Alternatively, a static IP can be given to the board by running
ifconfig eth0 <IPAddress>on the board. This may interfere with the DHCP running on the VCU network and might not work as intended. This method is not recommended.
On the FPGA, run ifconfig to find the IP address of the board (eth0).
Now you can connect to the board by running ssh -X root@<IPAddress> on the host machine.
-X enables X11 Forwarding, which is not necessary.
If ssh fails, make sure that both devices can reach eachother using ping. Also make sure that both the board and the host machine can successfully ping the default gateway.
Using HLS
First, follow this tutorial to make the ZCU102 platform for applications to be built on top of. Next, follow this tutorial to get a hello world project working. After that, all that needs to be done is change the code and rerun it.